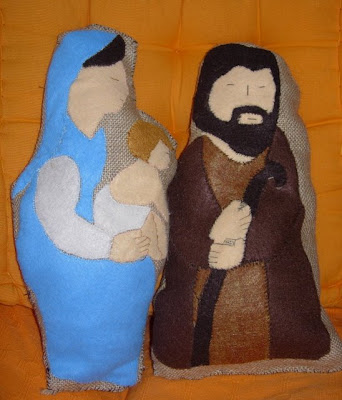
Come vi avevo promesso, ho finito il mio presepe in feltro e oggi condividerò con voi il cartamodello e la mia “tecnica”.
Il presepe in feltro
Ho scelto di realizzare questo Presepe morbido perché volevo che il mio bambino ci potesse giocare e allo stesso tempo fosse libero di spostare i personaggi a suo piacimento.
Quando sarà più grande il Presepe con le statuine di gesso prenderà il posto di questo mio lavoro, ma per ora è a sua completa disposizione per vivere il Natale a modo suo. 🙂
Scopri anche come fare le calze della Befana per regalare libri!

Per realizzarlo anche voi, vi occorrerà:
- feltro azzurro, rosa, bianco, marrone, nocciola e giallo scuro
- imbottitura
- juta
Come realizzare il Presepe:
Tagliate la juta, deve essere doppia per poterla chiudere e creare una specie di cuscino.
Ritagliate le parti che compongono il disegno dalla carta e puntatele con degli spilli al feltro del colore corrispondente.
Ritagliate il feltro seguendo il contorno.
Ricomponete il disegno sulla juta usando i pezzi di feltro appena tagliati.
Cucite con piccoli punti il feltro sulla juta facendo attenzione a far combaciare i pezzi. Aggiungete i dettagli come gli occhi e le dita delle mani con del filo scuro.
Cucite i due lembi identici di juta tra loro mantenendo le figure di Maria e Giuseppe all’interno, come a creare una specie di borsa. Lasciate uno spazio aperto per poter inserire l’imbottitura alla fine.
Rivoltate la juta e inserite l’imbottitura.
Cucite il lato che era rimasto aperto.
 Ritaglio del cartamodello.
Cut the paper


 Cucite con piccoli punti il feltro sulla juta facendo attenzione a far combaciare i pezzi.
- Felt blue, pink, white, brown, hazelnut and dark yellow
- stuffing
- jute
To create a three-dimensional Nativity:
Please download the paper and print it on A4 sheets (Letter size may work as well).
Cut the jute doubled: later we’ll join its borders to make a kind of pillow.
Cut out the parts that will make the design from the printed paper. Fix them to coloured felt with pins.
Cut the felt along the contours.
Reassemble the drawing on one of the two pieces of jute using the felt you cut. Sew them to the jute. Eventually, add details with a darker thread.
Keeping the felt figure you just made in the inner part, make a kind of bag joining together two identical shapes of jute.
Sewn all around the figures of Mary and Joseph, leaving a small hole to reverse it.
Referse the bag: the felt figures should be visible now.
Stuff it using the hole you left opened. Use padding of your choice
Sew the side that remained open: it’s done!
